Friday, March 28, 2014

Technickslide.com

That's right, I've lost the ".blogspot.com" extension to the name and bought a proper domain name. From here forward it's simply www.technickslide.com!  The blog might also be looking at obtaining a lovely makeover here in the near future!

I would like to thank everyone who's been following the blog and I hope you all continue to follow along with all of my drifting adventures!  Becca's 510 is being prepped to have some serious work done next month so make sure you keep checking back to see what's in store for that lovely lady!


Sunday, March 23, 2014

Luke Stilley's S13 At Shiomi Garage

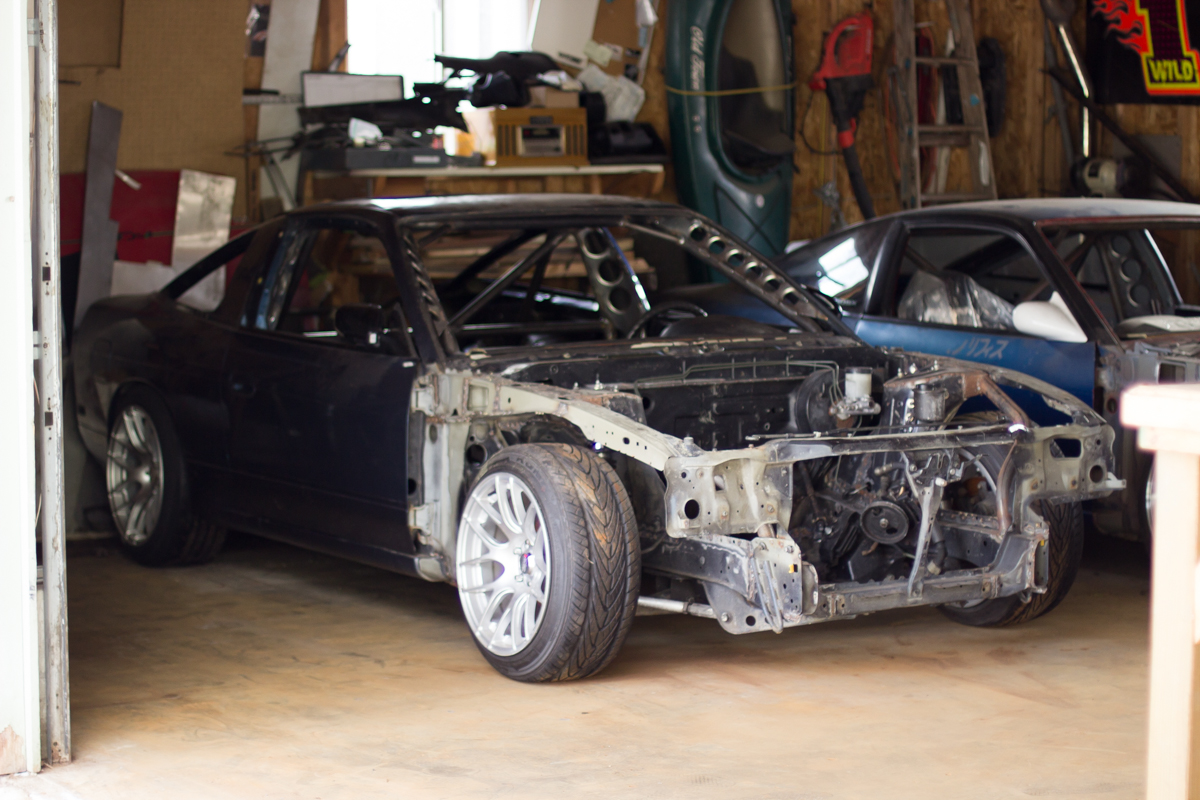
Last weekend I received a text from Travis telling me he had finished up the cage in Luke's S13.  Excited to see how it turned out I jumped in my car Sunday morning and set sail for Shiomi Garage to take pictures and make a finalized plan on when to bring the 510 up.

A quick drive north and I had arrived, this time there wasn't much snow in the driveway, and the temps were a lot better.  I rolled up to the place to find the coupe looking at me under a tarp, it had been moved around the driveway in preparations of being worked on next after Luke picked up his car.


Then before he made his way outside to greet me I took a quick look at the hatches sitting in the garage.


Soon enough Travis was outside and it was time to look the cage over and snap a couple shots.  Looking the cage over I was quick to notice it was designed just like his Sil80's cage, only Luke had opted to go with X bars instead of ladder bars.  I must say, it was a million times easier to climb in his car than climbing into mine.  Of course there weren't any seats in his car at the time, but I could still tell his will be much more simple to get in and out of.


Shortly after looking things over Luke had arrived with his trailer and it was time to move the car out in the daylight to prep loading it up.


I could see Luke was incredibly pleased with the cage, and like everyone else that's seen Travis's welds he was blown away by how amazing they were.  This then lead to Travis pointing out what he thought were flaws in 2 of his welds... Just to quickly specify for those that don't know, a flaw to him looks like something that was still done by a machine.  I don't understand how he see's them as flaws but I guess when you're that good at welding you can notice small differences that someone like myself would be none the wiser about.  Even Luke was baffled by how high of quality standards Travis holds himself up to.


Another happy customer for Shiomi Garage!  It's always nice to see people pleased with the work done from here.  

Now that Luke's car is all finished up it's time for the coupe to get some love and attention.  The tarps were removed and it was now ready to be pushed inside.


I'm excited to see how this thing turns out.  I helped push the car inside where Luke's car had been sitting, then went inside the house to talk about all sorts of cool things.  Before I knew it hours had passed and sadly it was time to leave.  Can't wait to see what's in store for my next journey up there!

Tuesday, March 4, 2014

Hodges S14 At Shiomi Garage

Over the weekend I decided it was time I made a trip up to Shiomi Garage.  It had been a while since I was last up there, so I wanted to go really badly.  Plus, Travis was also interested in buying some wheel spacers off Becca and instead of shipping them, a visit sounded like a much better option.

I started my journey around noon and arrived shortly after 1pm.  When I got there I found his driveway completely blocked by mounts of snow, so big I didn't dare attempted to plow my Sequoia through it.  Knowing that Hodges and Luke were going to be coming up with trailers and would be loading/unloading cars and a front clip I realized some shoveling was going to be part of my greeting.  Luckily it wasn't much work, I did a small portion and Travis took care of most of the snow barrier by blasting through it with a pickup.  After it was all done the driveway looked like it was possible to be driven up...


This picture was after shoveling and working on it.  As you can see, Shiomi Garage seemingly has a touch of a literal meaning behind the name with a driveway resembling Mount Shiomi.

After laying down some salt, it was time to go inside and warm up.  I brought over my collection of Video Option and D1SL DVD for Travis so we watched one of those and cracked open some PBR while we waited for everyone else to arrive.


Some time and a few beers later, everyone else had shown up.  Time to get up, and prep for taking photos in the -4 degree temps outside.  Seriously, -4, I have no idea how he does it.  He built the whole cage in this weather, no heater or anything to be found in the garage.  You'll notice a good portion of the floor has a layer of ice over it even!


I was really diggin the cage.  Always killer fab work to look at!


Between snapping some pics of the S14 I noticed Brett had found his way into the Sil80 which he looked rather comfortable in.


Back to the cage, I found everything very pleasant to look at. It was all nicely tied in together with welds that look so good you find yourself questioning if it was done by a machine and not a human.  A skill I wish I possessed, maybe someday I can have him teach me to weld like he does.


Moving on to the front you'll see the car has been tubed for more wheel clearance.  This however wasn't done up at Shiomi Garage, but still killer to look at and suits the overall appearance of the car.


After looking the car over it was time to unload the RHD S14 front clip that Hodges had brought up with him.  Which leads me to question... Does this mean Shiomi Garage is going to be getting a 3rd car!?


Along with the front clip came a complete S14 subframe with all the arms, diff, knuckles, and hubs.  Heck even the brakes came with it as well.  I spoke to Travis about it a little bit and he told me this might find it's way into the Sil80 since the S14 has better anti squat over the S13 subframe.


Off came the clip and subframe, and on went the S14.  Unloading and loading everything was rather nice and easy, mostly due to the fact there were 8 of us there to move everything.


Just like that, Hodges was off and on his way back home while a few of us stayed a bit longer.  Luke had brought up his S13 to have a cage done that needed to be unloaded.  Funny thing was I didn't even notice that happening, I had stopped inside to warm up for a minute since my fingers were frozen from taking pics without gloves on.  Before I knew it I turned around to hear the car was already in the garage and I had still yet to thaw out.

Sadly I completely spaced on taking pics of Luke's car, but no worries.  I'm sure I'll be making another trip up there soon enough to take a few.

Thanks for reading! See you next time!

Monday, March 3, 2014

GReddy Intake

Just the other day when speaking to my friend Brett, I found out he had a GReddy intake manifold, along with cold pipe, S14 throttle wheel (needed for installing on an S13), and some stock injectors/fuel rail he was looking to sell.  The deal he offered turned out to be one of those, too good to pass up deals.  So I dipped into my turbo funds and picked this package up.


I'm really looking forward to installing this, my engine bay is an absolute mess and could use some serious TLC.  Plus this baby should help with making slightly more power too.

Friday, February 28, 2014

Shifting With Style!

So for a few years now I've been wanting to make a custom katana handle shift knob.  Finally after staring down the Kirin Ichiban katana style tap handle, I decided one of those should do the trick.  I set to looking around on the interwebs in order to find one and not only did I succeed I also found out that Sapporo (my fave Japanese beer of the two) also makes a katana style tap handle.

What did I decide on doing you ask? I bought both!


I can't wait for them to arrive, gonna need to make an adapter for them then test em out in the car.  I'm thinking I'll rock the Sapporo one in my 240 and give the Kirin one to Becca for her 510.  Then we can both be shifting with style!

Tuesday, February 11, 2014

テクニック☆スライド

So lately I've been really working hard on some "logo" ideas for Technick Slide.  It's been super hard.  Spent a few months toying around with little sketches here and there but nothing really looked right.  Then a new Anime show came out that caught my eye.  It's called "Space Dandy".  Really diggin the show and found it to be super awesome.  So much I began thinking about getting a decal of the show title on the car.  That's when I was hit with a killer idea.  Replicate the show title with Technick Slide!

With the idea in my head I set to work.  First thing first, how to spell Technick Slide in Japanese... Got in touch with an old high school friend who moved to Japan to be a teacher.  Quickly he got back to me with some ideas for it and we both came down to the conclusion of going with テクニックスライド for the spelling.  It reads as "tekunikku suraido".  Now with that figured out it was time to sketch up a drawing.  Sorry it's not all that pretty, all I have to work with is Microsoft Paint so I did what I could without spending a crazy amount of time on it.


As for the Space Dandy logo that I replicated.  This is what it looks like.


Now I just need to get Adobe Illustrator so I can make a really nice version of it and have it made into a decal!

Saturday, February 1, 2014

GKtech Custom Steering Arm P1 Testing

Yesterday I found a chance to head out to my garage and test out version 1 of my prototype steering arms.  I must say things went a lot better than I had expected them to.  Fitment was perfect, plenty of clearance for everything, and the most important bit, more steering angle was achieved.

On to the pics!  Please when looking at them keep in mind they aren't going to be all that pretty.  I would like to point out a few things.  Yes, I know my brake lines are too short and I'm going to get longer ones SOON. I also know the bolts holding the arms on are sticking out, reason for that is I only put them in with my fingers, with the arms locked in place from the grooves and bolts in there, I didn't see any need to tighten them down since I had to re fit them multiple times trying the arm at multiple heights.  The pics I took of the arms attached are at the highest height and I'm aware that I shouldn't run them that high, I also tested them at the next two lower heights, just didn't take pictures of each height since that would get rather boring to look at.  I think that should cover it all :)


Shots of the lead angle and trailer angle at full lock.


I tested, and tested, and tested the arms at various mounting heights, suspension heights, with the suspension at full droop and under full compression (well attempted full compression just had the cars weight on it so when I hit bumps it'll obviously compress more).  With each setup I did a quick alignment (not perfect ones but close enough).  Everything went very well and I'm confident that with a few more changes I should be capable of obtaining another ~3 degrees of angle and reduce my ackerman some more to get it down to an area between 3-6 degrees which is where I want it.

Want to see what the version 2 (P2) prototype arms will look like?  Check it out!


Rather crazy looking when compared to the P1 design!


More to come soon! :D