Sick video of Modern Automotive Performance's Proving Grounds 2013.2 was just released today! Erik Blume did an amazing job with the video and I was incredibly surprised and pleased with the amount of times I appear in the video.
:38 Following PK
2:00 Tandem with the Angle Junkies crew
2:21 Following Gonzo
2:57 Becca makes an appearance with in car footage in the Z32
3:05 Doing a gnarly dirt drop while clapping on my door
3:57 In the middle of a tandem train
Check out the video for yourself and make sure to give it a vote up! Can't wait until next time!

Monday, September 23, 2013
Friday, September 20, 2013
Late Update #4 Shiomi Garage With Matt Hines and Big Country Labs
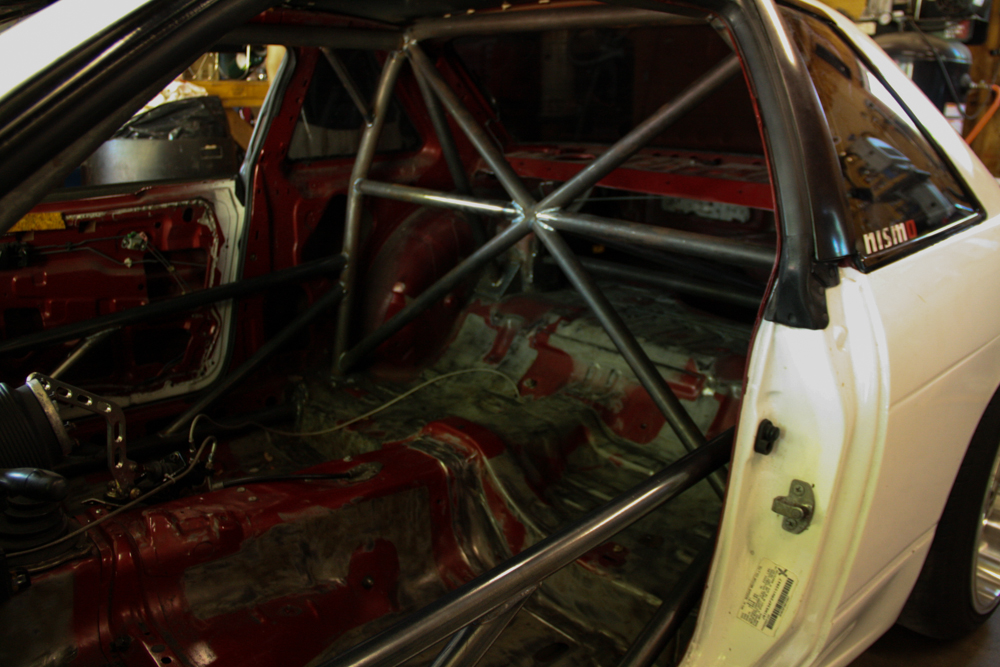
Since my last trip up to Shiomi Garage I had been blessed with the gift of my Big Country Labs wing arriving and finding its way onto my trunk. I couldn't have been happier as I'm sure some of you might have noticed if you read the update where I went about mounting the wing. There is one detail that I left out from that update, and that was how well it secured to the trunk. It didn't exactly secure that well... Where the holes were drilled to mount it they passed through a double layer of metal which I thought would be the perfect place for them as it would be extra bracing. Unfortunately even with 2 layers of metal it's still really flimsy and it began to collapse after driving up to Minneapolis and back. This was a problem because as the metal would crush together the bolts came loose, very loose...Luckily this was something I had noticed and I didn't lose my wing or any of the hardware holding it on for that matter. Still, after re tightening the bolts I knew this would just happen again right away so it was decided to make a trip up to Shiomi Garage to have the trunk braced that way I could properly bolt the wing down.


Now for those of you that read my blog you'll remember at Proving Grounds 2013.1, a few months ago, a friend of mine Matt had a rather unfortunate event take place. His coupe suffered from "smashing into a K barrier syndrome" aka he hit a wall.

I thought this was the end of the car but apparently I was wrong. He put it on a frame machine, squared the car, and then dropped it off at Shiomi Garage for Travis to work his magic...In less then 2 weeks time!
Back on track, it was Saturday morning and time to head that way, with some breakfast of course. I've decided to start a new thing where every time I leave to go somewhere in the morning I take a picture of my drink, which of course is always chocolate milk!

After a quick drive up there I had arrived. Then shortly after Matt had arrived as well in order to pic up his now caged and tubed front drift machine, which of course I made sure to take some pictures of!


Right away Matt set to work getting the seat put back in the car. Then we all sat in it and made race car noises. Noah was very pleased with how it was to sit in.

Then it was time to check out the front, which needed to have the hood installed and the upper radiator brackets made.


While that was being worked on I took the opportunity to drink plenty of beer... 40oz to be exact and stumble upon his Silvia front clip.


I found myself thinking how crazy it is that this front end was here. Surely back in the late 80's and early 90's the guy who put this front end together on the assembly line or the original owner would have never imagined it ending up cut off the car and sitting outside a garage in America.
Then after turning my attention back to the garage Matt's car was complete.


This meant it was photo shoot time! This meant pushing all three cars outside and arranging them nicely against the fence. I just wish the trees weren't there or the sun was in a different spot in the sky. I feel ashamed of the photos and since I'm not good with editing I feel extra ashamed with how the final product turned out. I'll definitely need to take some better shots of the three cars together sometime, but these will due for now.


The master himself even made sure to take some time sitting in the drivers seat of Matt's car.

Not long after it was time for Matt to leave, this meant pushing the car down the driveway and onto the trailer. Which surprisingly was super easy to do.

Then strap it down.


And of course have Travis photo bomb one of the pics.

Now it was time to get the Sil80 back in the garage and start work on my lady.

After quickly pulling my BCL wing of Travis set to work welding some sleeves to prevent the trunk from buckling again.

Then we put the wing back on and well... That was it.

We spent the rest of the ridiculously hot day dehydrating ourselves by slaying some beers and getting some food. That then lead to trying out a quick drift which went bad in a hurry. Over shot the corner and catapulted the car backwards off a ditch like incline into a bumpy grassy field... This tore up my driverside fender pretty bad but it wasn't anything major. (sorry no pics)
After that I decided I should probably drink some water, and while attempting to sober up and hydrate myself I took the time to install an ISIS boost controller that doesn't come with instructions.

First install attempted failed miserably as it didn't work. After that I decided maybe I should just take some pics of the Sil80 instead.

I really love the back of the car. I don't know how it could possibly be sexier, it's exactly how I in-vision the perfect looking hatch. Sick boso style wing, no rear bumper, and some blast pipes sticking way out!

After that I found myself motivated yet again to make a second install attempt.

That too failed miserably. It kinda sorta worked but not really. Plus it made the car run like complete ass because of the air being bled off by the controller. So I decided to just forget about it and keep the car at factory boost levels.
As it began to get dark I found myself with a throbbing headache. I clearly had drank too much and with it being over 100 degrees outside all day I was also most likely dehydrated. It was a sign for me that I needed to head home. I packed everything up, thanked Travis for the help with the car and hanging out all day, and took my last peak at the lovely Sil80 before I left.

I'm really looking forward to my next trip up there, even if I find myself driving home at night with an unbearable headache again.
Tuesday, September 17, 2013
Late Update #3 The Haunted Turbo
I've come to believe that my turbo is haunted. That or my car has a mind of its own and it's trying to tell me I need to ditch the stock t25 for a real mans turbo. Since I've owned Igna, she's always had 2 issues. First one being the diff output shaft always popping out (I ended up resolving this one after a good 2 years) and the second one being the damn nuts/studs on the turbo outlet. I've replaced the nuts a countless number of times and have tried multiple different ways to try and make them stop backing out. Unfortunately, all of my attempts continued to fail. I tried locktite, star washers, lock washers, nylon locking nuts with locktite and lock washers, replacing the studs with bolts with lock tite and lock washers. I've tried every combination of nuts/bolts I could buy but in the end after 2 weeks or so the nuts would back out and I would have a horrible exhaust leak...


Then one day on my way to work the car decided that it was going to take this problem to the next level. The exhaust bolts/nuts backed out and snapped one of the studs inside the turbo.

This couldn't have happened at any worse of a time. Proving Grounds was just around the corner and at this time we were still working on finishing up the Z32 so I didn't have time to deal with drilling the stud out.
I ended up coming to the conclusion of it being my turbo elbow and downpipe being the issue? Maybe if I replaced them with one where I can get better access to the nuts I could maybe tighten them down a little bit stronger? I made the decision to order a new outlet and downpipe.
With money being tight I didn't really have much for choices, this left me with giving the ISIS 3" outlet and downpipe a go. Which I have heard many good reviews on.

I must say I was rather impressed with the quality!


The second the parts arrived I immediately got to work on installing them. In a matter of no time at all I had the old outlet and downpipe off, this of course because there just weren't any nuts/bolts holding it on, well there were 2 holding the downpipe to the test pipe.

Thinking I was doing great on time I decided to grab a bite to eat, then when I got back it had begun to get rather dark...maybe eating wasn't such a good idea. Either way, with this being an easy job to do having to do it in the dark wouldn't be an issue.
Next I attached the new downpipe and turbo outlet.

This is where I found my one complaint about the product. I spent an extra $20 to get the 3" outlet and apparently it wasn't really going to do much for me since the downpipe has a reducer where it meets the outlet... Although after looking at it, it doesn't appear to be too far off.

I then did a quick comparison between the new/old, and again I found myself rather impressed with the ISIS setup. Much more impressive looking flow characteristics!


Now all I had left to do was put it on the car with new bolts, locktite, and lock washers.

The bottom bolts on the turbo are the worst, the steering column just has to be in the way and make this a super pain in the ass. I found myself having to modify one of my wrenches to fully tighten all of them. In the end though, it went on and the fitment was great! Sits up much higher then my old one so hopefully that'll mean less bottoming out!


All that was left is to drive around for a few weeks and see if it holds up or the nuts/bolts back out again.
Monday, September 16, 2013
Late Update #2 Z32 Teardown and Assembly
Late late one night... Well actually it was more like 8:30 so not that late. A little white 300zx was driving through the town. Halfway to its destination a sudden little tick appeared. It was just a little quiet tick at first but this was no ordinary tick. Only a few blocks down the road it began to worsen. Quickly it got louder and louder until the lovely car had reached its stop. At that point it had grown to be an animal, something in the cars big heart was not happy.
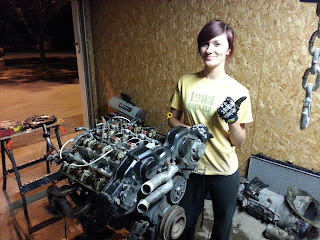
As you can tell, something went wrong with the Z32. This small tick turned into a very very loud one that almost sounded like a solid knock. Not exactly a situation Becca and I wanted to find ourselves in only a month away from Proving Ground 2013.2! We had no choice but to immediately get to work, the problem needed to be diagnosed and then it needed to be fixed. Initially when it started I thought something valvetrain related, but as it worsened it started to sound like the early stages of rod knock.
First thing first it was decided to check the heads, now I've never worked on a VG30 prior to this so I didn't know what the valvetrain setup was like. For all I knew maybe it was just a shim or something popped out of place. So we pulled the car in our tiny garage and set to work.
We started by removing the intake manifold and valve covers. Now since I've never worked on a VG30 I mistook the hydraulic lifters as being solid bucket shims. I tried sliding a feeler gauge through each one between the bucket and the cam and not one would let me slide the thinnest feeler gauge I had through. So me being the dumb ass I am just assumed they were fine. My thoughts of rod knock filled my head... Engine pulling time is what this quickly turned into.
Becca quickly dropped the exhaust.

Then after quickly removing the radiator, fan, wiring, and other misc things she got to work on dropping the trans.


Surprisingly this didn't take very long and we were ready to pull the motor...only problem was neither of us own an engine hoist and we were needing one asap. Thankfully Craigslist came to the rescue and we found a killer deal on one that somebody claims they only used once, and with how good of shape it was in I believe him.

After some quick thinking on how to hook up the hoist to the engine, out came the motor.


Then after removing the clutch and flywheel, I dug up an old engine stand I forgot I owned and had something to put the motor on.
First order of business was to remove the stupid EGR that kept throwing a code since we had it unhooked and venting to atmosphere.


Then off came one of the exhaust manifolds, upside down she went, and off came the oil pan. Time to do some inspecting!

No shavings, no anything. Did the "wiggle" test with each rod and there wasn't any free play like you would find with rod knock. Decided to go the extra step and pull the caps off the rods and inspect each bearing. They all checked out perfect.
At this point we were very confused, maybe the noise was coming from the valvetrain after all? That's when I was told what I thought were solid bucket shims actually have hydraulic lifters inside of them that have a tendency to get air inside. Everyone says it's incredibly loud too.
So we flipped the motor back over and got to work on removing the lifters. Right away when setting the motor at TDC we discovered that one of the intake cams were off by 2 teeth!!! Now I didn't want to pull the heads so I looked down inside the lower intake and could see the valves. None of them appeared to be bent and when we had done a compression test the compression was good on all cylinders. So I decided they were fine and set to work getting the lifters out.


Keeping everything in order as we took it apart. Well everything except the lifters because the order they go back in doesn't matter since we were going to be taking them apart, cleaning, and rebuilding.


Didn't take long to pull them all out of the head and have them disassembled. Sorry for lack of pics with taking everything apart, I figured I would take them as everything was put together that way my hands would actually be clean enough to hold a camera and the pics would look nicer. So be patient with my big gaps in shots.


Then it was time for some cleaning. Now when reading up on how the lifters are rebuilt I found a thread where a guy dips his parts in a gunk/small parts cleaner. I've never worked with this stuff before but since it worked for him I figured it should work for me.


In went the parts, and while we waited 2 hours for them to soak Becca got to work on cleaning the engine.


After the 2 hour wait on the parts to soak we pulled them out and threw everything in a bucket to take home, so we could rinse and dry everything off.


Everything turned out so clean that they all looked brand new. I was beyond impressed with how well this stuff worked!
Back at the garage it was assembly time. First thing first, put the return spring in, fill with oil, then slide the valve piston in, fill the top of that with oil, and bleed.


Slowly but surely everything came together and we had all the lifters bleed.

Once that was done, filled the tops with oil again to make sure they were completely full, put the hat on them, and snap them into the buckets.


All assembled it was time for them to go into the heads. Made sure they were coated in oil and slipped them right into place.


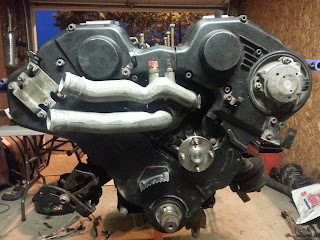
Next up, installed the cams with new cam seals.


Then put on the back timing belt covers, and clean everything as it was installed.


Install the cam gears.

Align all the timing marks and put the new timing belt on.

Then throw on the valve covers.


And finish up with putting on the front timing belt covers.


Then it was time to call it a night and wait for the final pieces to arrive.
When removing the hoses a lot of them were so old and hard that they broke and I even had to cut a few in order to get them off. This was something I had forgotten about... Luckily Z1 does 2 day shipping so we quickly got a complete order of all new silicone hoses. PCV, IAA, coolant bypass, heater core, and brake booster hoses.

Then it was off to the parts store to get some clamps because only one of the hoses came with some.

Now for some pictures of the coolant bypass and PCV hoses in place.
Coolant bypass

PCV


Up next was to do some work on the intake manifold. We decided to delete the throttle body heater lines because they don't really do anything other then get in the way and supposedly reduce HP due to heating up the throttle bodies.


After capping off all the lines on the back of the engine we removed the hard lines on the bottom of the intake manifold and installed the EGR block off kit at the same time.


While I had been working on that Becca had cleaned all the old gasket making material off the thermostat housing, applied new gasket maker, and installed the housing/hoses.
Then on went the upper intake manifold.

Following that we put the IAA hoses on.


Then looked at a pile of all the old crap we took off and looked at how much better the back of the engine looked.


This is when I made a huge mistake. I hadn't put the oil pan back on yet, and my idiotic self thought, "lets flip the motor back over to make it easier for us to install it."

Then my mistake settled in... You can't turn hydraulic lifters upside down as they will leak the oil out and take in air... All that time and work...
We spent the entire next day taking it all back apart and re bleeding the hydraulic lifters. As to not have this be a complete waste of time we decided to replace the front main seal while we were at it.
It took the whole day to get all the work done but we did it and it was all back together!

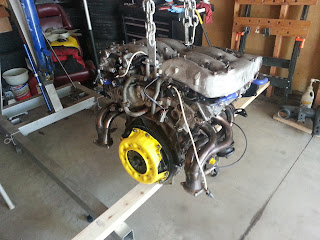
It was finally time to put the engine back on the hoist to prep it for going back into the car.

Becca quickly installed the flywheel and clutch with locktite and torquing everything to spec.

We then pushed the car in the garage and slipped the heater core hoses on setting the engine back in.

As Becca lowered the engine in place I attached the heater hoses to the motor, made sure the mounts went into place, and celebrated the car finally looking like it would be in once piece again!


All that was left to do was remove the charcoal canister now that we decided to do the complete EGR and some weird air prime bypass.

Then we set to work putting everything back on.

Belts, fan, wiring. All that was left was to install the radiator, radiator hoses, intake pipes, trans, exhaust, and fill it up with fluids.
I figured at this point pretty much everything has been seen so I didn't take any more pics of the rest coming together. However I did get a shot of the new wheel spacers we picked up. Something as little as moving the wheels out seam to have the biggest effect on appearance.

Then it was finally time, initial start up! Time to see if we did everything right and fixed the problem! A couple turns of the key primed the fuel then she started right up. Discovered it was missing on one cylinder...I had somehow missed plugging in one injector. Didn't take but 30 seconds to figure this out, after plugging it in the car purred like a cat. You could really hear a difference in the exhaust tone too now that the cam timing was correct, heck when driving you can definitely feel the difference too! Has more power and it accelerates so smooth!


Becca says it feels good having the car back home in the driveway.
One last thing I would like to add. I left a ton of shit out, and don't read through this thinking all the work happened in 2-3 days because it didn't. This job took us nearly 3 weeks working on it everyday from 6:30pm until 11 or midnight, then all day on the weekends. There were countless issues with the parts stores not having parts in stock and ordering in the wrong parts (replaced every seal and gasket we removed along with both the front and rear main seals), this delayed us on several occasions, plus with cleaning everything that took up a good chunk of time. In the end the work got done in time for PG and the car is running better then ever! I've never been so proud of my girlfriend. This was her first time doing work like this on an engine and I must say she did a fine job!
As you can tell, something went wrong with the Z32. This small tick turned into a very very loud one that almost sounded like a solid knock. Not exactly a situation Becca and I wanted to find ourselves in only a month away from Proving Ground 2013.2! We had no choice but to immediately get to work, the problem needed to be diagnosed and then it needed to be fixed. Initially when it started I thought something valvetrain related, but as it worsened it started to sound like the early stages of rod knock.
First thing first it was decided to check the heads, now I've never worked on a VG30 prior to this so I didn't know what the valvetrain setup was like. For all I knew maybe it was just a shim or something popped out of place. So we pulled the car in our tiny garage and set to work.
We started by removing the intake manifold and valve covers. Now since I've never worked on a VG30 I mistook the hydraulic lifters as being solid bucket shims. I tried sliding a feeler gauge through each one between the bucket and the cam and not one would let me slide the thinnest feeler gauge I had through. So me being the dumb ass I am just assumed they were fine. My thoughts of rod knock filled my head... Engine pulling time is what this quickly turned into.
Becca quickly dropped the exhaust.

Then after quickly removing the radiator, fan, wiring, and other misc things she got to work on dropping the trans.


Surprisingly this didn't take very long and we were ready to pull the motor...only problem was neither of us own an engine hoist and we were needing one asap. Thankfully Craigslist came to the rescue and we found a killer deal on one that somebody claims they only used once, and with how good of shape it was in I believe him.

After some quick thinking on how to hook up the hoist to the engine, out came the motor.


Then after removing the clutch and flywheel, I dug up an old engine stand I forgot I owned and had something to put the motor on.

First order of business was to remove the stupid EGR that kept throwing a code since we had it unhooked and venting to atmosphere.


Then off came one of the exhaust manifolds, upside down she went, and off came the oil pan. Time to do some inspecting!

No shavings, no anything. Did the "wiggle" test with each rod and there wasn't any free play like you would find with rod knock. Decided to go the extra step and pull the caps off the rods and inspect each bearing. They all checked out perfect.
At this point we were very confused, maybe the noise was coming from the valvetrain after all? That's when I was told what I thought were solid bucket shims actually have hydraulic lifters inside of them that have a tendency to get air inside. Everyone says it's incredibly loud too.
So we flipped the motor back over and got to work on removing the lifters. Right away when setting the motor at TDC we discovered that one of the intake cams were off by 2 teeth!!! Now I didn't want to pull the heads so I looked down inside the lower intake and could see the valves. None of them appeared to be bent and when we had done a compression test the compression was good on all cylinders. So I decided they were fine and set to work getting the lifters out.


Keeping everything in order as we took it apart. Well everything except the lifters because the order they go back in doesn't matter since we were going to be taking them apart, cleaning, and rebuilding.


Didn't take long to pull them all out of the head and have them disassembled. Sorry for lack of pics with taking everything apart, I figured I would take them as everything was put together that way my hands would actually be clean enough to hold a camera and the pics would look nicer. So be patient with my big gaps in shots.


Then it was time for some cleaning. Now when reading up on how the lifters are rebuilt I found a thread where a guy dips his parts in a gunk/small parts cleaner. I've never worked with this stuff before but since it worked for him I figured it should work for me.


In went the parts, and while we waited 2 hours for them to soak Becca got to work on cleaning the engine.


After the 2 hour wait on the parts to soak we pulled them out and threw everything in a bucket to take home, so we could rinse and dry everything off.


Everything turned out so clean that they all looked brand new. I was beyond impressed with how well this stuff worked!
Back at the garage it was assembly time. First thing first, put the return spring in, fill with oil, then slide the valve piston in, fill the top of that with oil, and bleed.


Slowly but surely everything came together and we had all the lifters bleed.

Once that was done, filled the tops with oil again to make sure they were completely full, put the hat on them, and snap them into the buckets.


All assembled it was time for them to go into the heads. Made sure they were coated in oil and slipped them right into place.


Next up, installed the cams with new cam seals.


Then put on the back timing belt covers, and clean everything as it was installed.


Install the cam gears.

Align all the timing marks and put the new timing belt on.

Then throw on the valve covers.


And finish up with putting on the front timing belt covers.


Then it was time to call it a night and wait for the final pieces to arrive.
When removing the hoses a lot of them were so old and hard that they broke and I even had to cut a few in order to get them off. This was something I had forgotten about... Luckily Z1 does 2 day shipping so we quickly got a complete order of all new silicone hoses. PCV, IAA, coolant bypass, heater core, and brake booster hoses.

Then it was off to the parts store to get some clamps because only one of the hoses came with some.

Now for some pictures of the coolant bypass and PCV hoses in place.
Coolant bypass

PCV


Up next was to do some work on the intake manifold. We decided to delete the throttle body heater lines because they don't really do anything other then get in the way and supposedly reduce HP due to heating up the throttle bodies.


After capping off all the lines on the back of the engine we removed the hard lines on the bottom of the intake manifold and installed the EGR block off kit at the same time.


While I had been working on that Becca had cleaned all the old gasket making material off the thermostat housing, applied new gasket maker, and installed the housing/hoses.

Then on went the upper intake manifold.

Following that we put the IAA hoses on.


Then looked at a pile of all the old crap we took off and looked at how much better the back of the engine looked.


This is when I made a huge mistake. I hadn't put the oil pan back on yet, and my idiotic self thought, "lets flip the motor back over to make it easier for us to install it."

Then my mistake settled in... You can't turn hydraulic lifters upside down as they will leak the oil out and take in air... All that time and work...
We spent the entire next day taking it all back apart and re bleeding the hydraulic lifters. As to not have this be a complete waste of time we decided to replace the front main seal while we were at it.
It took the whole day to get all the work done but we did it and it was all back together!

It was finally time to put the engine back on the hoist to prep it for going back into the car.

Becca quickly installed the flywheel and clutch with locktite and torquing everything to spec.


We then pushed the car in the garage and slipped the heater core hoses on setting the engine back in.

As Becca lowered the engine in place I attached the heater hoses to the motor, made sure the mounts went into place, and celebrated the car finally looking like it would be in once piece again!


All that was left to do was remove the charcoal canister now that we decided to do the complete EGR and some weird air prime bypass.

Then we set to work putting everything back on.

Belts, fan, wiring. All that was left was to install the radiator, radiator hoses, intake pipes, trans, exhaust, and fill it up with fluids.
I figured at this point pretty much everything has been seen so I didn't take any more pics of the rest coming together. However I did get a shot of the new wheel spacers we picked up. Something as little as moving the wheels out seam to have the biggest effect on appearance.

Then it was finally time, initial start up! Time to see if we did everything right and fixed the problem! A couple turns of the key primed the fuel then she started right up. Discovered it was missing on one cylinder...I had somehow missed plugging in one injector. Didn't take but 30 seconds to figure this out, after plugging it in the car purred like a cat. You could really hear a difference in the exhaust tone too now that the cam timing was correct, heck when driving you can definitely feel the difference too! Has more power and it accelerates so smooth!


Becca says it feels good having the car back home in the driveway.
One last thing I would like to add. I left a ton of shit out, and don't read through this thinking all the work happened in 2-3 days because it didn't. This job took us nearly 3 weeks working on it everyday from 6:30pm until 11 or midnight, then all day on the weekends. There were countless issues with the parts stores not having parts in stock and ordering in the wrong parts (replaced every seal and gasket we removed along with both the front and rear main seals), this delayed us on several occasions, plus with cleaning everything that took up a good chunk of time. In the end the work got done in time for PG and the car is running better then ever! I've never been so proud of my girlfriend. This was her first time doing work like this on an engine and I must say she did a fine job!
Subscribe to:
Posts (Atom)