
3.1 - Steering Rack and Over Centering
3.2 - Angle Spacers (both slip on and bolt on) http://www.technickslide.com/2015/01/informational-series-part-32-rack.html
3.3 - Offset Spacers http://www.technickslide.com/2015/01/informational-series-part-33-rack.html
A quick disclaimer before we start. I'm going to be keeping this as basic as I can, however, there are some rather complex bits and a lot of things some of this stuff will effect. I'm not going to discuss those during these posts as each one will require it's own lengthy post. I do plan on covering the following related topics down the road however. Some of the things will be ackerman, bump steer, tie rods, different steering knuckle designs, and control arms. Those subjects I will for sure have in a later post and those things will be mentioned at some time during part 3. If you don't know what some of those things are, or you do know and don't have much of a grasp on them. Don't worry about it, those are things you probably don't need to know too much about yet.
With that all out of the way, lets being!
I wanted to start this off by talking about over centering however I quickly realized I should first begin with what parts are all involved. Steering rack (I will only be using racks for this part as I don't know enough about the other steering mechanisms such as the steering boxes that are used on some old cars), inner tie rods, outer tie rods, steering knuckle, and lower ball joint.
For those of you that don't know let's talk about how a steering rack works to steer a car. This is very important for this subject, in fact it's the most important part of it. A steering rack can basically be broken down into 3 parts. Rack, pinion, and the casing. There are of course a lot more parts to it but these are the three main things you need to know. The pinion is a circular gear, this gear is attached to your steering shaft. When you turn your steering wheel the pinion gear is what you're turning. This gear then spins on the rack. The rack is a long "rod" which has teeth in it. As the pinion turns, the gears push on the teeth of the rack which will cause it to slide left or right in the casing.

Above I have drawn a very simplistic break down of a steering rack. For this example I used a left hand drive (LHD) rear steer style rack. I'll get to the difference between front steer and rear steer in a moment. As for this example you can see when straight the rack will be centered within the casing, as you turn left the pinion gear will turn and push the rack out to the right of the casing, and of course when turning right you will see it goes out to the left of the casing. The reason I pointed out that this is a rear steer rack is because on a front steer rack things are flipped and reversed.

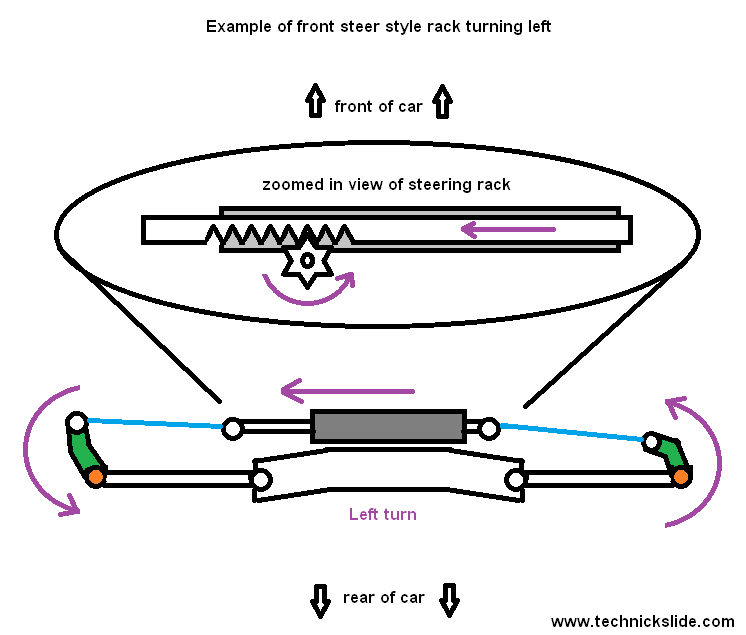
Here is an example of a LHD front steer style rack. As you can see all the parts are the same and everything works the same except on this the pinion is now on the bottom. This makes it so when you turn right the rack is pushed out to the right of the casing, and left gets pushed left.
What exactly does front and rear steer mean and how is it put to use? Well, lets talk about rear steer as S-Chassis have rear steer style racks. When talking about rear steer I'm not talking about the rear wheels steering I'm talking about the front wheels still. There are two locations you can mount a rack, in front of the ball joints where the steering arms would be on the front of the knuckles (towards the nose of the car) or behind the ball joints where the steering arms would be on the rear of the knuckles towards the rear of the car. S-Chassis has its arms on the rear of the knuckles so the rack is mounted behind the ball joints.

This is an example of a rear steer rack and how it goes about turning left. As you can see, the rack is mounted behind the lower ball joint and the steering arms point towards the rear of the car. With arms like this in order to turn left the rack must pull in the left arm and push out the right arm. This is why when turning left you need the rack to go out to the right of the casing. Then in order to turn right you would need it to go out of the left of the casing.
Now with a front steer car the rack would be in front of the ball joints so the opposite would be needed. Push on the left knuckle and pull on the right.
This should hopefully sum up pretty much everything you need to know up to this point. There's a lot more that goes into steering than this but this is the fundamentals and this is how it all works on a very basic level.
Moving on now, let's quick talk about the remaining parts. Connected to the rack are the tie rods, the inner tie rods or "rack ends" as some people call them are just a simple bolt on joint with a threaded rod attached to them. Those then have an outer tie rod that threads onto the threaded end. The outer tie rods have their own joint on the other end which is then bolted to the steering arm of the knuckle. If you refer to the rear steer rack turning left example you'll see where I've labeled the tie rods and coloured them blue. I could go further in depth with these but for now I would like to keep them simple so just think of them as a rod with two ball joints on either end. One connecting to the rack and the other to the steering arm. Then of course we also have the knuckle itself which pivots on the ball joint.
These are the key parts that you need to know about in order to talk about over centering.
I'm sure if you are around drifting talk you've heard of the term before, but what is over centering exactly? The simplest explanation I can think of is comparing it to hyper extending your knee. Going past straight (center) and bending backwards in the wrong direction. On a car you can think of the tie rod as the top half of your leg, the outer tie rod joint as your knee, the steering arm as you lower half of your leg, and the ball joint as your foot. When pulling a steering arm in as it turns the outer tie rod joint comes around in a circular motion pivoting around the ball joint as its center. If pulled far enough it'll reach a point where if you drew a line from the inner tie rod joint to your ball joint the outer tie rod joint would be on that line. At that point it's considered to be centered, anything past that is over centered. Centering your steering can be rather bad and over centering is a nightmare. Just like your knee, this is something you don't want your car to ever do, especially while running near a wall or other drivers.

Here are two examples. The top one shows what I mean by centered. I've drawn a yellow dotted line from the ball joint to the inner rack joint, when centered the outer ball joint will land on this line making the steering be considered centered. The second example I've drawn a red dotted line, for over centered you'll see the outer ball joint has gone past the center line making the steering be considered as over centered.
Why are these things so bad? Well when you're centered, as you go to turn your wheel in the other direction, you won't be able to turn it, the tie rod will be pushing the steering arm joint straight at the ball joint. When it's like that there isn't any force pushing the arm out so the wheel can then turn right. This will cause a jam in your steering wheel. You will not be able to turn the wheel yourself at this point, and will be left praying that the wheel will correct itself and pull out of being centered so you can have control again. It's not a good feeling to have and I know this from experience. Luckily for me my car was able to come out of it and I could steer again.
For over centering, things become much worse. When you're turning left and over center, as you go to turn right you'll find the steering bind even worse. Once you pass center as you go to turn the wheel the tie rod will be pushing on the steering arm to turn the wheel even farther left. It'll then run into the bump stop or lower control arm (that is if your steering is located on the same level). This is where you run into the jam. The wheel wont be able to pull out of this one because you'll be trying to turn right and that'll keep the wheel wanting to turn more left.
Most racing doesn't ever run into this kind of thing as a lot of steering input isn't used. However with drifting, you want to be turning the wheels as far as you can to get the most amount of angle from the car without spinning. That's why you'll usually only ever hear drifters talking about this problem, and it's more common of a problem then you would think. This can be a car killing issue to have. Running close to a wall at full lock then have your steering over center, it'll leave your wheels pointing towards the wall, it'll pull you out of drift then cause you to turn right into the wall. You could also be mid tandem with a car behind you, go for a transition but have your wheel lock up. It'll make for a very aggressive spin that's not going to be easy for the following car to dodge. This problem causes accidents and it kills cars.
Don't worry though, if you find yourself running into this issue there are ways to fix it. The best option is to move your steering rack closer to the ball joints. So on a rear steer car you would move your rack forward, and on a front steer car you would move your rack backwards. This would move the steering centering line with it and reduce your chances of over centering or even make it impossible. Another option would be to run offset rack spacers which would keep your rack in it's stock position but would move your inner tie rod pivot forward or backwards depending on front or rear steer. Then of course you've always got the option of adding a bump stop or adding more to a current bump stop making it so your steering can only turn so far and never reach a point of centering or over centering.

Hopefully this has provided you with some understanding on how a steering rack works and what over centering is. Make sure you keep an eye out for chapter 2 where I'll be talking about rack angle spacers, then the final chapter where I'll tell you all about offset rack spacers!
No comments:
Post a Comment